Recreating Diagrams in Pikchr #2: Dissecting the Story of Mel
This is a diagram I found on Dissecting the Story of Mel by Jürgen Müller on the now-infamous Story of Mel.
One of the things that piqued my interest in the RPC-4000 was the role it plays in the “Story of Mel”. A famous piece of hacker folklore describing the early days of programming – when “abstraction” and “modularity” were not a thing yet.
This is a GREAT dissection into the mechanics of this story of folklore. I’ve been on the lookout for interesting looking diagrams and Jürgen pulled straight gold out who knows where:
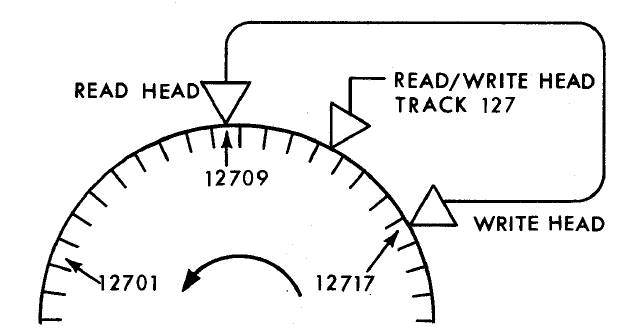
Now THAT is a beautfiul diagram.
The learnings
Of course I couldn’t pass up this opportunity to recreate it. It looks strangely similar to the layout used by pikchr!
The key learnings for me was to use lines/splines to create the “speedometer” semi-circle. If you count the segments in the original, there’s 11 every 90 degrees.
The other big learning was the use of macros. They shrunk the script big time. They made the speedometer much more readable and the triangles as well.
Click to see the code
$circleStepSize = .15
$circleStep = 90/11

define circleSplice {
 line from previous line.end go $circleStepSize heading $circleStep*$1
 spline from 1/2 between previous line.start and previous line.end then go .1 heading $circleStep*$1 + 90
}

line invisible
circleSplice(0)
circleSplice(1)
circleSplice(2)
circleSplice(3)
circleSplice(4)
circleSplice(5)
circleSplice(6)
circleSplice(7)
circleSplice(8)
circleSplice(9)
circleSplice(10)
circleSplice(11)
circleSplice(12)
circleSplice(13)
circleSplice(14)
circleSplice(15)
circleSplice(16)
circleSplice(17)
circleSplice(18)
circleSplice(19)
circleSplice(20)
circleSplice(21)
circleSplice(22)

define triangle {
  $1: line from ($2) \
    go .6cm heading (150 + $3) \
    then .6cm heading (-90 + $3) \
    then .6cm heading (30 + $3) \
    close
}

RHeadPoint: dot at 12th line.end + (0cm, 1mm) invisible
triangle(RHead, RHeadPoint, 180)
RHeadBack: dot at 1/2 way between 2nd vertex of RHead and 3rd vertex of RHead invisible

RWHeadPoint: dot at 16th line.end + (.5mm, 1mm) invisible
triangle(RWHead, RWHeadPoint, $circleStep * 14 + 90)
RWHeadBack: dot at 1/2 way between 2nd vertex of RWHead and 3rd vertex of RWHead invisible

WHeadPoint: dot at 20th line.end + (1mm, .5mm) invisible
triangle(WHead, WHeadPoint, $circleStep * 18 + 90)
WHeadBack: dot at 1/2 way between 2nd vertex of WHead and 3rd vertex of WHead invisible

text at 2nd vertex of RHead + (-2mm, 0mm) "READ HEAD" big rjust
text at RWHeadBack + (.5cm, .5cm) "READ/WRITE HEAD" ljust big "TRACK 127" ljust big
line from RWHeadBack go up .7cm then go right .4cm
text at 3rd vertex of WHead + (2mm, 0mm) "WRITE HEAD" big ljust

$corner = .25

Rise: line from RHeadBack up .5cm
TopLeftArc: arc cw from Rise.end to Rise.end + ($corner, $corner)

TopRun: line from TopLeftArc.end right until even with last text.e + ($corner/2, 0)
TopRightArc: arc cw from TopRun.end to TopRun.end + ($corner, -$corner)

Drop: line from TopRightArc.end down until even with WHeadBack + (0, $corner)
BottomArc: arc cw from Drop.end to Drop.end + (-$corner, -$corner)
line from BottomArc.end left until even with WHeadBack

arrow from RHeadPoint + (0,-2mm) go down .5cm <-
text at .5cm below previous "12709"

arrow from WHeadPoint + (-2mm, -.5mm) go down .5cm left .5cm <-
WHeadText: text at previous + (-5mm, -5mm) "12717"

OtherPoint: dot at 4th line.end invisible
arrow from OtherPoint + (1mm, -.5mm) go down .25cm right .5cm <-
OtherText: text at previous + (7mm, -2mm) "12701"

spline from WHeadText.end + (-1mm, -1mm) \
  go .35cm heading -25 then .35cm heading -50 \
  then .35cm heading -75 then .35cm heading -100 \
  then .35cm heading -125 then .35cm heading -150 ->
Holy spaghetti code batman!
If you ventured to see the code and are curious about it, let me know! I’ll do a breakdown of how this works if someone (literally anyone) asks!
Recent Blog Posts
- 26 Sep 2026 Recreating Diagrams in Pikchr #2: Dissecting the Story of Mel
- 20 Sep 2026 Recreating Diagrams in Pikchr #1: So I have a weatherman, which also tells me the news
- 09 Jun 2026 Almost realtime deploy logs in my SaaS
- 08 Jun 2026 The long list of bad decisions I made for my new SaaS
- 13 Apr 2026 Your intuition of LLM token usage might be wrong
- 11 Feb 2026 Locust Load Testing and Markov Chains
- 20 Jan 2026 I love the old man minimap in VS Code
- 03 Jan 2026 On Resurrecting a 12 year old blog
- 09 Oct 2014 Updating a forked Git repo
- 06 Oct 2014 ADB access to remote server from local usb