-
20 Jan 2026 »
I love the old man minimap in VS Code
If you don’t use the minimap in VS code you probably turned it off a while ago (like me). I thought it was small and useless unless your code has a very distinct structure.
It’s kinda like sublime’s minimap:
But…
I was recently perusing the options in VS code and noticed you can change the size of the minimap. There’s 3 settings and the last one makes me feel like an old man pulling out a magnifying glass to read a newspaper (almost there practically).
-
03 Jan 2026 »
On Resurrecting a 12 year old blog
This used to be an old blog of mine. So much has changed in 12 years.
Then and now
It used hosted on Github Pages. Now it’s on Cloudflare pages (or is it Cloudflare Workers?)
It used to run using jekyll (ruby). Now it’s running on hugo (golang). The first public release of hugo was July 5, 2013
It’s not just the tech that changed. My life is totally different. Back then I was just finishing college, I was broke, and I had no job or life prospects. Now I’m employed, financially stable, and moved to another country. It’s humbling the amount of change that can happen in a dozen years. I do weigh about the same, thankfully!
-
09 Oct 2014 »
Updating a forked Git repo
A while ago, I forked the ActiveAndroid repository to add some of my own changes to the ORM framework. Today I wanted to use the library again, use the new changes that the original maintainer has implemented, and also use my own changes. It turned out to be easier than I thought, despite there being 112 commits between the original repo and my forked version. Here’s what I did
$ git remote add upstream [email protected]:pardom/ActiveAndroid.gitThen to fetch the updates
-
06 Oct 2014 »
ADB access to remote server from local usb
I have a VPS server where I’m compiling CyanogenMod and some android kernels. To compile CyanogenMod we need to pull some vendor specific “prebuilts” i.e. binaries. Connecting the server to the device connected to my laptop is actually quite trivial.
First we put adb in TCP/IP mode
adb tcpip 8001Then, let’s forward the that same port to the laptop
adb forward tcp:8001 tcp:8001Connect to the phone
-
30 Mar 2014 »
Bug Progress: Day 2
Here’s a small overview of my progress in fixing bug #924609.
Finding the code
We know how to replicate the video app’s thumbnail functionality. We just need to find the relevant code that generates (or doesn’t generate, in this case) a thumbnail for an attachment.
Here’s the path I took to find the relevant code
Compose.js- handles the UI section that creates a new text message.- clicking the attach button calls requestAttachment()
- this calls a MozActivity, the activity returns a blob of the attachment
attachment.js- object that represents an attachment- getThumbnail function found
The Attachment.getThumbnail functions is where we need to make the changes.
-
27 Mar 2014 »
Building the Emulator
In this post I will talk about my experience with building the Firefox OS emulator. It’s a simple process but the documentation is spread out over a couple of pages in the MDN.
Getting the code
The Firefox OS project is based on the Android project and is spread out over many Github repositories. The following commands fetch the code from the servers.
git clone git://github.com/mozilla-b2g/B2G.git
cd B2G
./config.sh emulator // Starts fetching code
The whole project is about 19 GB.
-
11 Mar 2014 »
Simple Notes: Edit Notes
In this post, I walk through the implementation of the Edit Note screen pictured below
Intuition fails
The
Edit Notesection is very similar to theNew Notesection. My first instinct was to use the samesectionfor both purposes and modify them in javascript according to which mode we were in. This is the essence of the Don’t Repeat Yourself principle, or DRY principle. -
10 Mar 2014 »
Simple Notes: Hidden Notes Fix
In this post, I will polish up the application and address one of its shortcomings: hidden list items. I did not test the list functionality fully when developing the application. This is what caused the bug to slip under the radar.
The Problem
The Problem can be summed up as follows. The scrollable section’s height was set to 100%. This means the height will be equal to it’s parent container. What I did not realize was that the header was also taking up space on the screen. This caused the scrollable section to overflow off the screen by a margin equal to the size of the header, which is
5rem. -
07 Mar 2014 »
Bug Progress: Day 1
I have volunteered to help fix a bug in Firefox OS. The bug is pretty small. It can be summed up as follows. When you attach a video to the SMS application, it shows a generic icon. Ideally it should show a thumbnail preview. In this post, I will explain my understanding of how the Gaia video application generates a thumbnail from a video.
MediaDB
MediaDBis the shared library that keeps track of the filesystem. It stores names, types, sizes and metadata about files.metadata.jsis the Video app library that wraps around theMediaDBlibrary. The reason for this is outlined in the source code documentation -
06 Mar 2014 »
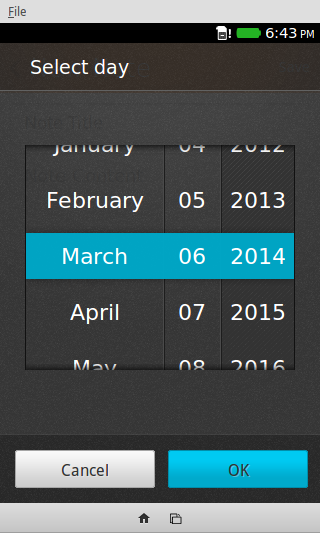
Simple Notes: Date
This is the final day in which I worked on the Simple Notes application. I implemented a due date for each note.
Selecting a date
Firefox OS comes with a native date picker optimized for mobile layouts. In order to call forth this date picker, one has to simple add the following
inputelement to a form.<input type='date'>And said Date picker looks like this
-
05 Mar 2014 »
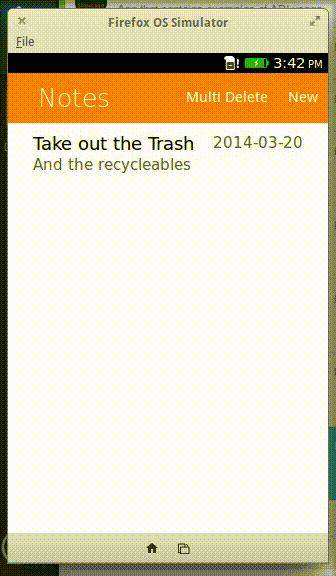
Simple Notes: Deleting
The next functionality I decided to implement was the ability to delete multiple notes at once. I originally planned to implement this functionality along with the index section, but there were a lot of little details that I overlooked during the planning phase that set me back.
Edit Mode
The user enters the multiple-deletion mode by pressing a button. I used the EditMode BuildingBlock to distinguish the UI between the regular mode and the multiple deletion mode.
-
04 Mar 2014 »
Simple Notes: Index
In this post, I will outline the modifications I did to the Simple Notes app in order to create the index screen.
Sectioning
The first order of business was separating the
Indexfrom theNew Notesection. I used the same CSS rules from the BuildingBlocks Transitions post. With these rules I could use the following structure to separate the sections.<section role="region" data-position="current"> <!-- Index section content goes here --> </section> <section role="region" data-position="right"> <!-- create-note section content goes here --> </section>With these sections wrapped, they can be easily switched in and out of the user interface by changing the classes. A more in depth explanation is provided in the aforementioned transitions post.
-
03 Mar 2014 »
Simple Notes: New Note
Over the next couple of days I will be creating an application that will store notes for the user. I will not spend more than 4 days working on it, so my top priority will be basic functionality and polish/features will follow afterward.
Today I will tackle the New Note screen, as it seems like the most difficult part of the application.
Database Structure
The database model used to store notes is simply
-
28 Feb 2014 »
Building Gaia
In this thread I will cover my experience building the Gaia interface from the source code. I followed the Quickstart Guide at MDN.
Note: I used a linux distribution based on Ubuntu Precise (12.04). This is not meant to be a guide, I’m just merely documenting my experience.
Getting the Source Code
The source of the Gaia interface is located at https://github.com/mozilla-b2g/gaia. It uses the Git version control system. To copy the code to my computer, I used the clone command
-
27 Feb 2014 »
IndexedDB Caveat
This post will explain a caveat of the IndexedDB API that I have encountered and my work around.
The Caveat
Part 1 of the IndexedDB posts explains that it’s possible to store objects using a
keyPathandautoIncrement. The documentation states that the key will be stored inobject[keyPath]if it doesn’t exists already. This is not true. Examine the following code// open a transaction and access the object store var objStore = ...; // object store has keyPath and autoIncrement // obj = object with keyPath undefined var obj = ...; var request = objStore.add(obj); request.onsuccess = function(event) { console.log(obj.keyPath); };This will add an object and print the value of the objects
keyPath. When running the code, it printsundefined. This is against what the documentation states, but there is an easy work around. It is this utility function. -
26 Feb 2014 »
WebAPI: IndexedDB Part3
In this post we will wrap up IndexedDB by exploring cursors and indexes. Make sure you read part 1 and part 2.
Cursors
A cursor allows an app to iterate through all the results of a query in a manner that does not block the main UI thread. Opening a cursor is simple, just call
openCursor()on an object store. It returns an IDBRequest object. The result of the request will be the cursor. The object retrieved by the cursor is incursor.value. To retrieve the next object callcursor.continue()and the function will be called again recursively. The function will be called one last time when there are no more results to the query. A common flow is as follows -
25 Feb 2014 »
WebAPI: IndexedDB Part2
In this post, we will cover how to add, get, update, and delete records from IndexedDB.
Transactions
All of these operations are done through the respective methods in the object store interface. The only way to access an object store is through transactions.
IndexedDB is a transactional database, so any changes to the database are passed through a transaction context. Transactions take a list of object stores affected by the transaction and a mode. The available modes are
-
24 Feb 2014 »
WebAPI: IndexedDB Part1
In this post, I will introduce IndexedDB. As the name suggests, it is a lightweight database. It’s not a relational database however, it’s a key-value database. It maps keys to javascript objects (or primitives). The API is a little more difficult to grasp than the other APIs offered by Firefox OS so this post is broken up into two parts. The first part will talk about how to create the structure of the database, and how to open and close the database.
-
21 Feb 2014 »
WebAPI: Device Storage
This post will give a short demonstration of the Device Storage API.
The storage types
Firefox OS divides the storage into the following storage areas.
apps: This storage area is used to store the user data needed by apps. Only available for certified application only.music: This is the storage area where music and sounds are stored.pictures: This is the storage area where pictures are stored.sdcard: This is the storage area that give access to the device’s SD Card.videos: This is the storage area where videos are stored.
To access a certain storage area, use the
navigator.getDeviceStorage()method. Also, each storage area requires explicit permissions. For example, to access thesdcardandvideosareas, the following is needed in the manifest -
20 Feb 2014 »
Submitting a Firefox OS bug
This post documents my experience submitting a bug report to the Firefox OS project. The bug resides here. Hopefully it’s not a duplicate (I searched for a while), and hopefully it will benefit the project in the long run.
Stumbling on a bug
I found the bug while messing around with the Contact API. When an application wishes to use the Contact API, the system will present a user with a prompt. The user can choose to deny or allow the application access to the API. The prompt looks like the one below.
-
19 Feb 2014 »
BuildingBlocks: Status
The Contacts part of the API Showcase application does not show a lot of information to the user. All the information is displayed in the console. A good way to remedy is to use the Status building block.
The Simplest
This is by far the simplest building blocks to use by virtue of the implementation of the building blocks demo (download here). In order to take advantage of this, simply copy the following from the demo
-
18 Feb 2014 »
BuildingBlocks: Confirm
This post will show one way to implement the Confirm dialog from the building blocks. We will ask the user confirmation when deleting all contacts. We will be using the Transitions to show and hide the dialog.
Importing
Like all BuildingBlocks components, the
Confirmdialog must be imported. Download the building blocks sample application, and copystyle/confirm.cssstyle/confirm/
Into your application structure and link
confirm.cssin the index page.confirm.cssexpects theconfirmfolder to be in the same directory. -
17 Feb 2014 »
WebAPI: Contact Continued
Last post we explored the Contact API, but ran into permissions problems. This post, we’ll show the fix and show the last part of the contacts API. Try the (working) demo and check out the source code.
Wiping the slate
The most destructive API call in is by far the
clear()command. It will remove all contacts from the device. The system does not step in and warn the user while the command is happening, so the duty is delegated to the application. In the future we will implement an alert dialog for this particular demo, but for now here is the code. -
14 Feb 2014 »
WebAPI: Contact
In this post we will be exploring the Contact API.
Creating a Contact
The code to create a contact differs between Firefox OS v1.2 and v1.3
var contactData = {
  givenName: ["John"],
  familyName: ["Doe"]
}

// V1.2
var person = new mozContact();
person.init(contactData);

// V1.3
var person = new mozContact(contactData);

// Platform independent code
var person = new mozContact(contactData);
if( "init" in person ){
	person.init(contactData);
}
Once the contact is created, it must be saved. The save() method returns a DOMRequest object. We can listen for success or errors by passing callbacks.
-
13 Feb 2014 »
WebAPI: WebActivities
In this post, we will take a quick look at the WebActivity API. WebActivities are basically parts of apps that register with the system. When a user wants to perform a certain action that many apps can accomplish (like share, choose an image, take a photo, etc), the system will present the user with all the registered applications that can accomplish that action.
Starting an Activity
In order to launch one of these activities we create a
MozActivity. The parameter is an object with the following -
12 Feb 2014 »
BuildingBlocks: Transitions
On the previous post, we finished implementing a drawer but we didn’t have true navigation functionality. The drawer simply changed the button that the user was able to click. In this post, we will use Transitions.
The Structure
We will separate our app into three parts. Let’s start with the
Notificationsection<section id="notification" role="region" data-position="right"> <header class="fixed"> <a id="btn-notification-back" href="#"> <span class="icon icon-back">back</span> </a> <h1>Notification</h1> </header> <div role="main"> <button id="btn-notify"> Notify Me!</button> </div> </section>Notice that the header contains a back button with the
a#btn-notification-back. The content of the page is underdiv role="main". -
11 Feb 2014 »
BuildingBlocks: Drawer
Building on our previous work, we’re going to separate the notification demos, from the alarm demos using the Drawer. Download BuildingBlocks here.
First Attempt
According to the documentation, all we need to implement the drawer is to import
headers.css- the
style/headersfolder drawer.css- the
style/drawer.cssfolder
Then we can specify the navigation in the sidebar with the following HTML
<section data-type="sidebar">
  <header>
    <menu type="toolbar">
      <a href="#">Done</a>
    </menu>
    <h1>Demos</h1>
  </header>
  <nav>
    <ul>
      <li><a href="#">Notification</a></li>
      <li><a href="#">Alarm</a></li>
    </ul>
    <h2>Misc Demos</h2>
    <ul>
      <li><a href="#">Text Clock</a></li>
      <li><a href="#">Image Clock</a></li>
    </ul>
  </nav>
</section>
This is broken down into 2 parts:
-
10 Feb 2014 »
BuildingBlocks: Buttons
Before we keep exploring WebAPI, we can take a moment to build a UI foundation our API Showcase app. I previously mentioned Gaia Building Blocks. It’s a mini GUI framework for Firefox OS. So far, the application only showcases 2 APIs: Notification and Alarm. Let’s examine the Button building block
Downloading
You can download Building Blocks here. This is an archive of the sample application for the framework, but the framework is the collection of files under the
styledirectory. -
07 Feb 2014 »
WebApi: Alarm
This post will cover the Alarm API. Instead of creating a brand new application, we will modifying the
API Showcaseapp. As always, I would encourage you to try the demo.Permission
The
AlarmAPI requiresalarmspermission. The following is required in the manifest file"permissions": { "alarms": { "description": "Required to schedule alarms" } }The permission level is
default. That mean anyhostedorpackagedapplication can access this API. -
06 Feb 2014 »
WebApi: Notification
This article will show how to use the Notification API. We will be building the app
API Showcasethrough the rest of these series to quickly test each new API. Try the demo of version oneNote: This is the icon for the new application

Permission: Manifest
Unlike the previous post, the
NotificationAPI requires requesting a permission. This can be done one of two ways: through the manifest or through the API itself. However, Firefox OS does not support requesting permissions after an app is installed. The required permission is calleddesktop-notification. -
05 Feb 2014 »
WebAPI: BatteryManager
In this post were going to explore the (small) BatteryManager API.
BatteryManageris returned bynavigator.battery. You can interface with the object in the following wayslevelchargingTimedischargingTime
The battery manager also dispatches the following events
levelchangechargingchangechargingtimechangedischargingtimechange
You can add an event listener using
addEventListenerinterface.function updateStatus() { var battery = navigator.battery; console.log('Battery: ' + battery.level * 100 + '%'); console.log('Charge Time: ' + battery.chargingTime); console.log('DisCharge Time: ' + battery.dischargingTime); } function addBatteryListeners() { var battery = navigator.battery; battery.addEventListener('levelchange', updateStatus, false); battery.addEventListener('chargingchange', updateStatus, false); battery.addEventListener('chargingtimechange', updateStatus, false); battery.addEventListener('dischargingtimechange', updateStatus, false); } addBatteryListeners(); updateStatus();Now we can test this…but it’s a lot of trouble to create a new application to test this little bit of javascript. Thus, this leads us to an introduction to some of the developer tools.
-
04 Feb 2014 »
Simple Clock: Images
In this post, we modify the previous app to create an analog clock using images. Try the Demo
HTML:
<!DOCTYPE html>
<html>
  <head>
    <meta charset="utf-8">
    <title>Simple Clock: V2</title>
    <script type="text/javascript" src="js/app.js"> </script>
    <link rel="stylesheet" type="text/css" href="css/style.css">
  </head>

  <body>
    <div id="clock-container">
      <img id="clock-face" src="img/clock-face.png">
      <img id="hour-hand" src="img/hour-hand.png">
      <img id="minute-hand" src="img/minute-hand.png">
      <img id="second-hand" src="img/second-hand.png">
    </div>
  </body>

</html>
We’re going to use a div that contains all the images. This will make it easier to position the images. We’re going to exploit the fact that all images fit within 256px x 256px
-
03 Feb 2014 »
Simple Clock: Text
In this post, we create a simple clock app.
HTML:
<!DOCTYPE html>
<html>
<head>
<title>Welcome to JS Bin</title>
</head>
<body>
  <h1 id="clock"> Time </h1>
</body>
</html>
We are going to just replace the text inside the H1 with the id
clock.CSS:
h1 {
  position: absolute;
  top: 50%;
  left:50%;
  transform: translateX(-50%);
}
This is just a couple of rules to center the H1
Javascript:
var readyStateCheckInterval = setInterval(function() {
    if (document.readyState === "complete") {
        init();
        clearInterval(readyStateCheckInterval);
    }
}, 100);


function init() {
  setInterval(updateTime, 1000);
}

function updateTime() {
  var clock = document.getElementById('clock');
  var date = formatDate(new Date());
  clock.innerHTML = date;
}

function formatDate(d) {
  var hh = d.getHours();
  var m = d.getMinutes();
  var s = d.getSeconds();
  var dd = "AM";
  var h = hh;
  if (h >= 12) {
    h = hh-12;
    dd = "PM";
  }
    if (h === 0) {
        h = 12;
    }

    m = m<10?"0"+m:m;
    s = s<10?"0"+s:s;

  return h + ":" + m + ":" + s + " " + dd;
}
The this will get the time from a
Dateobject, format it to a 12 hour format that includes seconds, and will update the text of the H1. -
31 Jan 2014 »
A Quick Intro to Firefox OS for Devs
This post will give an overview of Firefox OS. The audience are developers of mobile applications.
WebAPI
The most interesting part of the OS to a developer is the API. The APIs provided by Firefox OS are officially called
WebAPI. They control access to the device hardware. The APIs are drafter by Mozilla, implemented in the current version of Firefox OS, and then submitted to the W3C in an effort to create standards. -
30 Jan 2014 »
Hello, World: Firefox OS Style
This is the first entry to the blog series dedicated to developing mobile applications for Firefox OS.
Hello, Firefox OS
Firefox OS apps are created using the standard web technologies: HTML, CSS, and Javascript. Let’s create three files that test the basic functionality of each of these technologies.
HTML:
<!-- hello.html -->
<html>
  <head>
	<title> Hello, Firefox OS </title>
	<script type="text/javascript" src="hello.js"> </script>
	<link rel="stylesheet" type="text/css" href="hello.css">
  </head>
  <body>
	<p>Hello, Firefox OS</p>
	<button type="button" id="coolButton">Do Something Cool</button>
  </body>
</html>
CSS: